
The Most Common Mistake Every Beginner Colorist Makes | DaVinci Resolve 17 Tutorial

What’s going on everyone! Welcome back to another epic video. Today I want to talk about the most common mistake that every beginner colorist makes. We are first going to go through the beginner way, then show you the pro way. This will change the way you work. This will make you so much more efficient.
Alright, let’s get started! First things first, most beginners don’t know what camera footage they are working with. You have to figure out what camera was used to create this. Our specific shot was shot on a BlackMagic Pocket Cinema Camera 4k.

When you don’t know what camera is used, you won’t know how to properly convert the footage, or know how far you can push the image. What they will do instead is start with a minor primary change. They will bring the lift down a bit, then bring up the gain.


Now adding a second node, they would then start in on their qualifiers. Starting with qualifying the sky.


From there they will go ahead and crank the saturation. Then they will mess with the gain color wheel to give the sky some color.

Then they would add another node to qualify her skin.


Because they have a lack of knowledge about keying, they won’t clean up the key, or work it hard to get it closer. Then they will crank saturation up, then take the gamma to where they think the skin looks good.


Then they will make another node to qualify the bag because they think the tool is so powerful. Then they will give it saturation and add that color in the gamma wheel.


Then they will create another node to grab the asphalt.


Then they would bring down the gamma a bit to darken the road.


Then creating another node, they will select her overalls and add saturation and gamma to get them looking nice and blue.


Boom, in their eyes this looks perfect. Now what’s wrong with this? Not only is this a terrible way to grade, but it’s going to be impossible to copy and paste from shot to shot.
Now, let’s start looking at the mistakes being made. Starting off with the sky, look at how nasty the edges around the clouds are.

Now moving to the skin, look at what is happening.

The key isn’t picking up everything, leaving some parts not corrected. Her face also looks unnatural and weird.
Now look at the windows.

That wasn’t there before. We created this.
Moving to the bag, for the most part it seems okay, but when you get up close to the hands, you can see that the color is being added to her fingers where we don’t want it to be.

It’s also hitting her nose and hair, making things look unnatural.

Then moving to the asphalt, we can see that the key is breaking, despite giving it some nice contrast.

Once people have this experience, they give up on grading and go back to using LUTs for their work.
This is the reason why people say to use qualifiers sparingly. You don’t have the time to punch in 800% on every frame to make sure you got everything. You have to grade a lot of shots in so little time.
Now let’s move into the pro approach. Now we are going to do this assuming that we didn’t get camera information. First of all, I will have some method to my madness in this. Let’s go ahead and build out a node tree.

Alright, first of all I am going to go back into my contrast node and we will add some contrast to the image. Then I will also open up my pivot a bit.


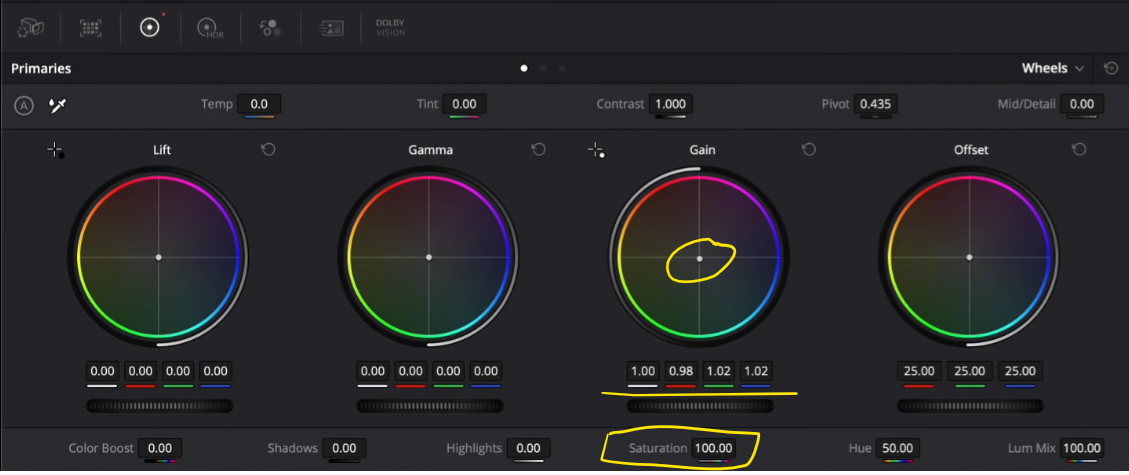
Now moving onto my primaries, I am going to bring down my lift and gain a bit, then push my gamma up to open up the middle but keep the contrast. Then I am going to crank my saturation to 100%.


Now don’t freak out yet, I have my HSL curves in here for a reason. Now instead of using our qualifiers to control color, we can use our HSL curves nodes to control our colors in a much more controlled way. I am going to start by using my hue vs saturation to pull down our yellow.


I am going to park it there for a bit and go to my first node to do some temperature and tint adjustments. I want to turn off my HSL node first, so I can correct the image before taking down yellow. The image is a bit too yellow/green, so what we are going to do is cool off the image with temperature. Then I am going to add some magenta in my tint. With that change, we are seeing colors we hadn’t seen before.


Now that we’ve done the white balance adjustment, we don’t need to take out as much yellow in the image. We will pull them up a bit more.

Now I want to move to the hue vs hue and take the blue and cyan up to add more teal into the sky.

Now if I want to give off the illusion that there is better dynamic range, I can go into my hue vs luminance and pull my cyan and blue down a bit.


Just look at how controlled and beautiful this is. The awesome thing is we don’t have to worry about it breaking or cracking. It is controlled so we can use this from shot to shot if we wanted to. Now what more can we do with this shot? We can take our hue vs saturation and pull up on our cyan and blue a bit more.

What this is doing is bringing up the sky a bit more, but also bringing some more saturation into her dress as well.

Now I am going to add another node, one skill that you should learn is how to use glow. What we are going to do is add glow and change the composite mode to softlight. Now we are going to go under our qualifier and use it the correct way. We are going to use the luminance slider to pick our shadow areas, which will pull up exposure on her a bit, but give her this magical feel.


Look at the difference we made. We added good contrast, and made this look super natural.
Now we are going to finish this off by adding grain to our image. For this, we are going to be using the 16mm preset and leaving it at that.


This is basically it. Now let’s take what an amateur created:

And now, look at what a pro does.

The moral of the story here is that you can do so much in Resolve, without using qualifiers and power windows. My suggestion is to perfect your primary game. Learn to massage your image and get the most out of it using the techniques I showed you. If you apply this very simple node tree to your next project, I promise you that you will be 60-70 times faster than you were before.
Quickly doing one more thing, I am going to crank the red saturation in the HSL node because that is where her skin and hair lie.


Okay, let’s check these out in full screen.


Now there was nothing revolutionary in this video. The things I showed you make a lot more sense for those who don’t know how to use these tools properly. Streamlining your process is everything when it comes to color grading. You won’t get as much time as anyone in the post-production process. It’ll get dropped on you last minute and you’ll have to get it done correctly, but fast. You can’t waste time doing trial and error. With that, work hard, get obsessed and stay possessed!
MORE LIKE THIS


