
DaVinci Resolve 17 New Features Overview - Tutorial | Start to Finish

What’s going on everyone, welcome back to yet another video. Today we are going to be discussing DaVinci Resolve 17 and all the awesome new features that came out in this update. We will be focusing on the color features, but I will touch base on the other new additions as well.
Here is what we will be covering in this video

We are going to start with probably the most anticipated update, the high dynamic range palette. Don’t get it confused with HDR, you can use it with any color management. It’s just giving you a more granular control over the image. Think of it as log wheels on steroids.
It’s broken up into zones, matching the zoning system of Ansel Adams.

Even the tools at the bottom (temp/tint, contrast, etc.) are different from those in the primaries tab.

With the click of a button, you can open up these zones and manipulate them to select specific parts of the image you want to affect.

The red is how much falloff, or feather (in Photoshop terms), that there is in the zone.
Now moving to our primaries palette, this got a nice facelift. The best part is that they added this row on the top, which used to be another menu at the bottom. Meaning, you had to click on the second tab when you wanted any of these options. Now they are all open so it speeds everything up.

You can also see when you move to the log wheels that the low range and high range are now on the top.

This is very effective, especially if you are a laptop user or using a mouse or tablet instead of a panel, it can speed up the process a lot.
Moving onto the saturation vs luminance curve, this is a brand new curve that was added. What you can do is select a luminance in your image and then you can adjust the saturation of that specific luminance. You do have to be careful with this because it can break the image, but there are times when it would really come in handy.

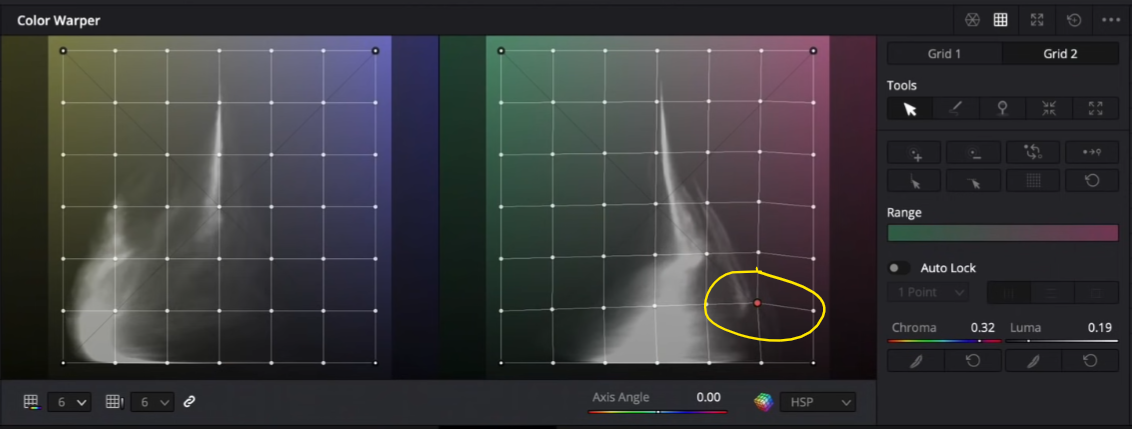
Moving next to the color warper. This is a tool where you can change multiple things at once.

In your HSL curves you can do one thing at a time. In the warper mode that we are in above, we can change the saturation and the hue at the same time. I am very impressed with how it’s handling the footage. It does a great job.

This tab is the chroma and luminance tab. What’s cool is when you hover over the image, it will show you (in both tabs) where exactly you are selecting in the color warper.
Another nice feature they added is when you click on the expand button, you can expand and detach the curves and even the color warper boxes.


The whole point of this is to be able to make more accurate corrections when using a pen or tablet.
Moving onto our node numbering, I am very excited about this. Before, if you created a pre-node, it would be labeled “9” or whatever the last number is, but now, if you do it, it labels it the number prior to the current node.
Moving onto the magic mask now, you can use this to select your subject, or even select just a single body part.

This is a great feature. You can select just a specific thing and then hit track, and it’ll try it’s best to track.

As you can see it does a great job.
The next change is they updated the scopes. They made it easy to switch the curves from SDR to HDR.

Another thing they did was make it possible to use 9 scopes if you want them.

I find it to be overkill, but it is a welcome update.
Alright, now we are going to get into the tutorial section, diving deep into each of these specific ones.

First we are going to build out our node tree.
Now, the sequence or position where each correction goes in the node tree is very, very important.
The high dynamic range corrections will not go after the primary adjustments. Remember that.
Here is our node tree.

We are going to first start with our contrast.


Moving to my primaries node, I will start by adding saturation. Now I am going to bring down my lift and gain a bit, but to get the details in the mids I’m going to bring up my gamma.


Now we are going to get into our HDR tools. First off, if I hit shift+H and click the little circles next to the levels, I can see what exactly that is effecting.


We need to program and teach the program a few things, that’s where the zones come into play. We use the zones to open up the selection. Now I am noticing that the image is a bit contrasty, so I am going to go under my shadows and lift them up. Then I am going to bring my light down. Then I am going to pull down my dark, but control it with my zone. Then I am going to raise my highlights to just pop the image. When doing this, I will be adjusting the other parameters a bit too.


Once that is done I am going to move to my glow node and add glow to these specifications


Now we are going to move to our color warp. What I am going to do is open it up to 16 points (in the bottom left) so that I have more control. Now I am going to click on the green and start pulling it down to create a surreal world around her.


Now I am going to create a parallel node, and here what I want to do is go under my magic mask, click features and select face, then select better. Then I am going to track it. Then I am going to raise my blur radius as well.
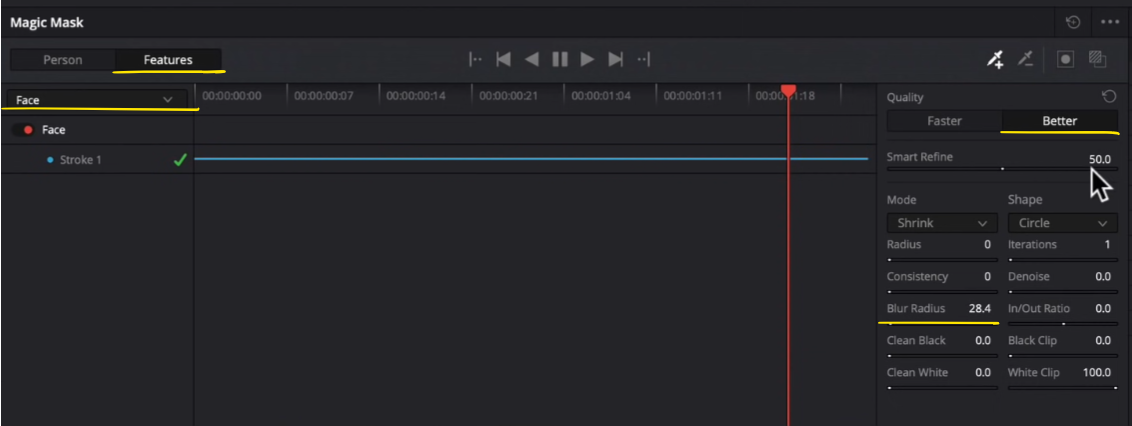
Then I am going to actually qualify her face, just to make it even more perfect.


Now I can use our color warp to make changes. I am going to go under my chroma and luminance options, click her skin, and lift it a bit.


Quick note, magic mask will slow your system down a lot. It is very taxing on your system, so use it sparingly.
Now I am going to move into our saturation vs luminance curve. I am going to raise the desaturated areas a bit.


Boom, just like that we are done. These new tools in Resolve are insane! Let’s check this out in full screen.


Alright, next we are going to talk about Resolve Color Management Presets. When you switch the color science to DaVinci YRGB Color Managed, it will do two things. First, it will give you lots of color management presets to choose from.

The second thing is it will take RAW footage and convert it to rec.709 properly, so you can just start grading.
I want to highlight a few of the color management presets. For SDR P3 Cinema, this is what you will use for digital cinema projection if you are going to be working on a movie or something like that. HDR P3 Broadcast is what you will use if you want to send it to Netflix.
Now moving to DaVinci Color Science. This is the first time DaVinci Resolve has introduced their own Wide Gamut. Look at this graph

Once you set it to this, all your tools work just as they would in rec.709.
Now we are quickly going to get to the edit and cut page additions. The one brand new feature worth mentioning in the edit page is this. If you right click on a clean out clip and create a timeline off a new clip, you can now do scene cut detection from your edit page, not just the media pool. If you go to the top under the timeline, scroll down until you find “detect scene cuts.”

Now moving to the cut page, live preview. What’s cool about this is now you can hover over effects in DaVinci Resolve, while in the cut page, and it will give you a live preview of what these effects will do to your image.

Now I want to talk about safe area. This is so good. If you pull on this little tab, you can see all the crops for different things. That way you can move your clip around and adjust parameters with safe margins.

Now let’s talk about timeline resolution. You can click up top and quickly pick the timeline resolution you want.

To make this even better, they added smart reframe. For this, all you do is click reframe and it will do all the work for you.

Now I want to highlight the quick export feature in the cut page. It’s not new, but it’s worth mentioning. If you click it at the top

But what’s cool is I can log into the social account I want, export it to there with a password, then give the client the password and they can watch it.

So clearly it makes sense why people are freaking out about DaVinci Resolve 17. It’s one of their biggest updates. So go take to the new format and start learning!
MORE LIKE THIS


