
Fastest Way to Grade in Resolve
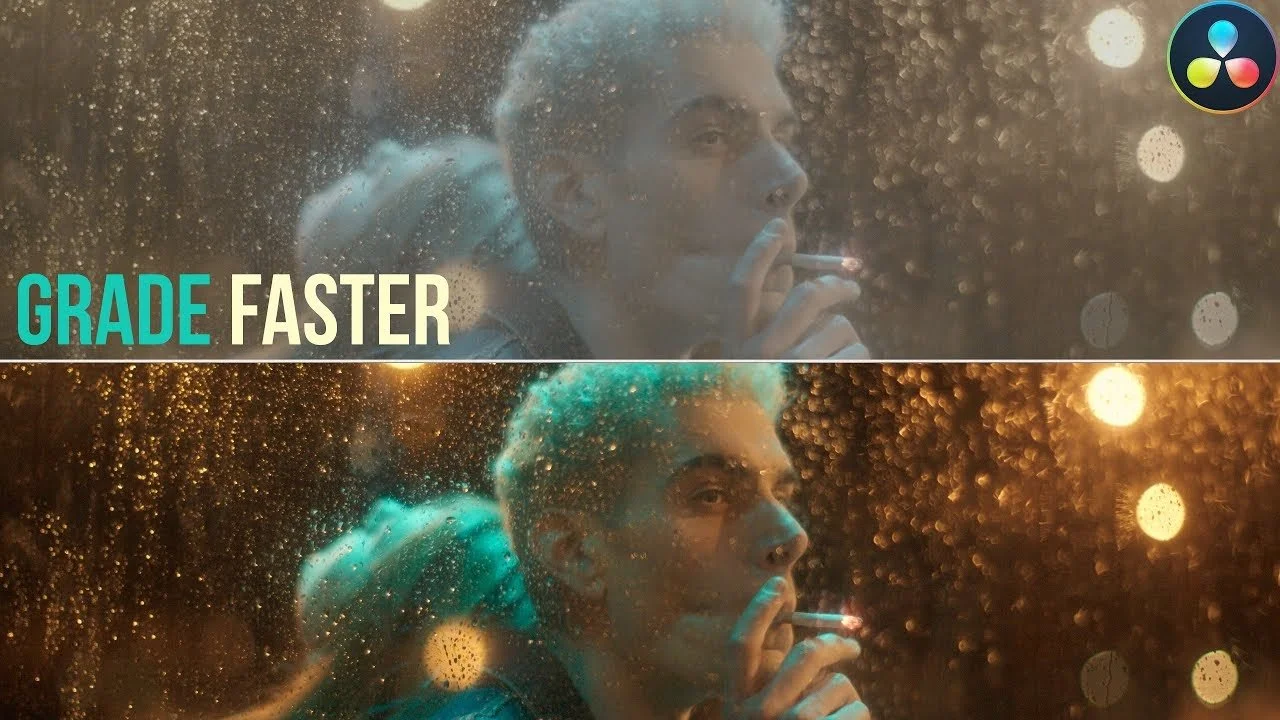
What’s going on everyone. Welcome back to another epic tutorial. Today we are not going to be grading one shot, but six shots from completely different cameras. Before DaVinci Resolve 17 it was rocket science to do your camera color science but now it’s simple.
Alright, let’s get this party started. What I am going to do is break this video down into four separate steps. This first step is resolve color management.

When you first get into it, these are going to be the settings.

The color science is not managed. So you will want to change it to this.

These are the settings you want to use. It is a cakewalk compared to what it used to be. The beauty about doing this is that this “can be mapped to HDR for output…” Basically you are future proofing your project.
Now step number two is camera metadata.

This is vital. There are a lot of misconceptions around RCM (resolve color management) in that people think once you set it to that, it’s properly converted. It is in certain circumstances and I will get to that later. For now, we need to find out more info about our camera.

From this metadata, it doesn’t give us much information about the specific camera used. One way to do this is by going to the edit page and clicking metadata and switch to camera and it will sometimes give you more information but in this case it doesn’t.

The problem with consumer cameras is that it doesn’t generally record all the information it needs to. Compare that to our next shot, we can see that it was shot on Alexa Mini.

Now what can we do when we can’t figure out the camera? You need to get a spec sheet from the producer and ask them what cameras were used. It’s a good practice to figure out and anticipate that. In this example, I do know which cameras these were shot on.
Now moving to step number three, input color space.

When you are in the color page, pop open the clips section so that you can see all your clips.

Now right click on the clip and find input color space. Then, select the correct input color space for the clip.


This is even close to a grade, just the conversion. We will get into grading this in a bit, but for now just look at it. Now you will do this for every clip in your timeline (if they are the same you can copy paste). This will properly convert your footage.
Now when it comes to RAW footage, it will be properly converted because Resolve can detect the RAW camera data from the clip and will know how to properly convert the footage. So you will only have to do this if it is a ProRes, DNxHR, .MOV or MP4.
Now step number four is primary correction, or what’s commonly known as a base grade.

Here we are going to do nothing extravagant, but just get it ready for proper grading. Starting with our first clip, we need to pull up the blacks a little bit. I am going to start by raising my offset up a bit.

Just like that we are done. It just looks so gorgeous.
Now moving onto our second shot, what do we need to do here?

Nothing much, but I think we can correct the white balance. So all I am going to do is take the white balance picker and click on the wall in the back.

Now if it is too much, we can go into our key output and change it to 50%.


Just like that, we are done. Let’s move onto the next one.
This pocket 6k clip needs a fair amount of work because it looks barely touched.

The first thing I am going to do is use my curves (with editable splines) and raise it from the top, then drop the bottom a bit too.


We can obviously add more to this image, but for right now it looks pretty beautiful as it sits. It looks very film-like.
Now let’s move onto our next shot from the C200.

Here, we can pull down on the gamma so that we can start seeing some information in our midtones.


Then in a new node, we are going to use our curves to add a bit of a pop.


Now creating another node, let’s go ahead and use our hue vs saturation and pull down on the red channel.

Then going into our hue vs hue, we want to change our red to be a bit more gold.


Now moving onto our RED shot, we are going to change our camera RAW metadata.

We are going to decode using clip and change our ISO to 400.

All I need to do here is use my curves to pop it a bit more. I want to open it up and give it that high fashion look.


Then I am going to create another node to just work on the temperature and tint. I am going to add some magenta into the image for her skin tones. Then I want to cool it off a bit.


The last thing I am going to do is swing the hue vs hue curve on red a bit to fix her skin tone.


Now let’s move onto our last image.

I am going to start by bringing my offset down a bit, but not too much.


I mean just look at that. That’s Sony footage and everything is looking good and protected there. That’s incredible.
Alright Let’s check these out in full screen.


Now you can clearly see how effective this process is especially in this day and age when we are working with multiple cameras on a shoot. Sticking with this process could be a game changer. So with that, work hard, get obsessed and stay possessed!
MORE LIKE THIS


