
Advanced Techniques to Create a Cinematic Look in DaVinci Resolve 17

What’s going on everyone! Welcome to yet another epic tutorial where we will be covering the advanced techniques to create a cinematic look. When you watch certain movies, or shows, you always wonder, what is that sauce? What’s that thing that makes it belong? That’s what you are going to be learning here. Now this is an advanced tutorial so you will need to know the basics.
Now getting started, there are a lot of moving pieces so pay attention. As always, we will first build out our node tree. To create this, having a proper node tree is a must.

Now our last node is for the Kodak 2383 LUT because as you can see from the screenshot below, there are a lot of your favorite movies that use this.

Most blockbuster movies were done using this film print. I am also trying to use built in tools.
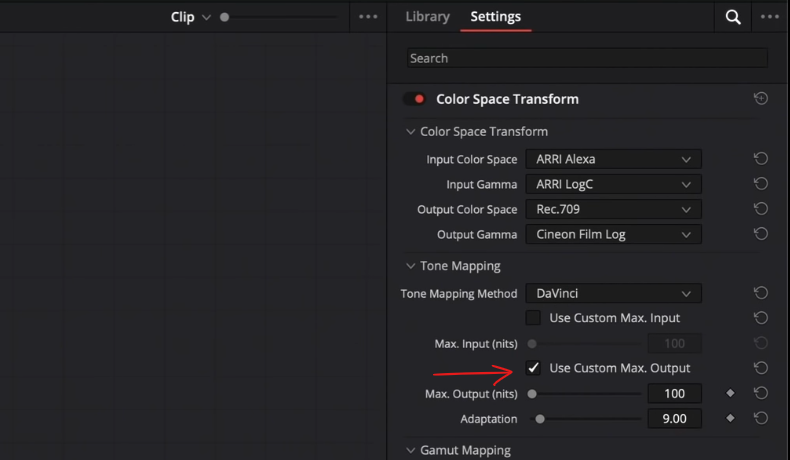
Now moving to our CST node, we are going to convert this from Alexa to rec.709. But for our output gamma, we will be using cineon film log because that’s what is needed for the lut to convert everything properly. Then make sure to check the use custom max output.
So now under our Kodak 2383 node, we are going to go into the luts tab and find film looks, then select the Kodak 2383 D60. This is the neutral of the three.


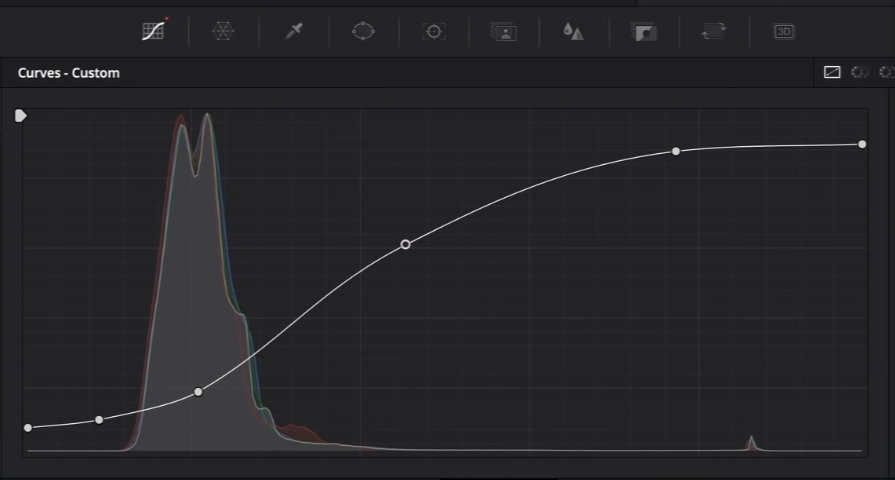
Now we are going to use our film curve to create a pretty aggressive curve. I am going to start by bringing up the bottom knuckle and down on the highlight. Then I want to swing down about 20% up from the bottom. Then bring up the middle and highlights.

Now moving to the primaries node, I want to lift up my gamma just a bit. Then I want to bring my gain down a bit. Then I am going to go under my printer lights and do half cyan.


Now this is where I want to go under noise reduction and start to clean it up (before shot down below).

We will use these settings to clean it up.


Now moving to our glow node, we are going to throw it on there, select softlight for the composite type, then bring back the threshold the whole way.


This made it almost more filmic.
Now moving to film blur, this will be hard to tell on YouTube, but I’ll do my best. Moving to our blur tab, normally we add sharpening by decreasing blur, but here we are going to do the opposite.


This did enough to make it more film-like, but not too much to where it would blur the whole image.
The cinematic look is just adding character and that is all we are trying to do here.
Now moving to the light rays node, we are going to search for the light rays OFX and drop it on. Once we do that, it looks super bad so we are going to tweak it. The first thing we are going to do is change the ray direction to at an angle. Then I want to extend the length all the way. Then I want to add softness as well.


This is so believable and adds so much character to the scene. This did the trick.
Just remember that the goal is to create a look DNA that can be applied on the whole entire scene, not just one shot.
Now moving to halation, we are going to drop it on. You will need to mess with it. So I am going to pull back my strength. Then I am going to increase the spread.


This did enough where it’s tastefully done, but gave it that sauce, that character. Also mind you, we aren’t using qualifiers or HSL curves. Just broad strokes. It’s about how you wield the sword.
Now let’s check these out in full screen.

Now you can tell there is a method to that madness and you can’t throw all different nodes in whatever order and hope for the best. There is a certain method. Now remember, work hard, get obsessed, and get possessed.
MORE LIKE THIS


