
New Features in DaVinci Resolve 17.4

What’s going on everyone! Welcome back to another epic, information packed video. Today I am going to be showing you some of the hottest features in Resolve 17.4. Now before we get into the tutorial let me say, you can watch these sorts of videos all day long and it won’t matter, unless you start implementing these new tools into your workflow. Usually stuff is cool for the first one or two weeks, then we go back to our old ways. But in this, I have hand picked everything that you need to incorporate into your own work. If you do all of this for 21 days, it will become muscle memory and eventually you will be using this in your color grading pipeline without any hesitation.
Okay let’s get this party started. I am always extremely excited when a new update comes out and we get features like this because it makes me feel like a kid in a playground. I get to learn as I go on these features.
We are first going to start off with our automatic color management. I brought in a bunch of different clips from a bunch of different cameras. Right now, you can see they are all in log. Now this will all change when we set up auto color management. Clicking on the gear icon in the bottom right, that will open up your project settings. In the color management tab, you will want to change the color science from DaVinci YRGB, to DaVinci YRGB Color Managed.
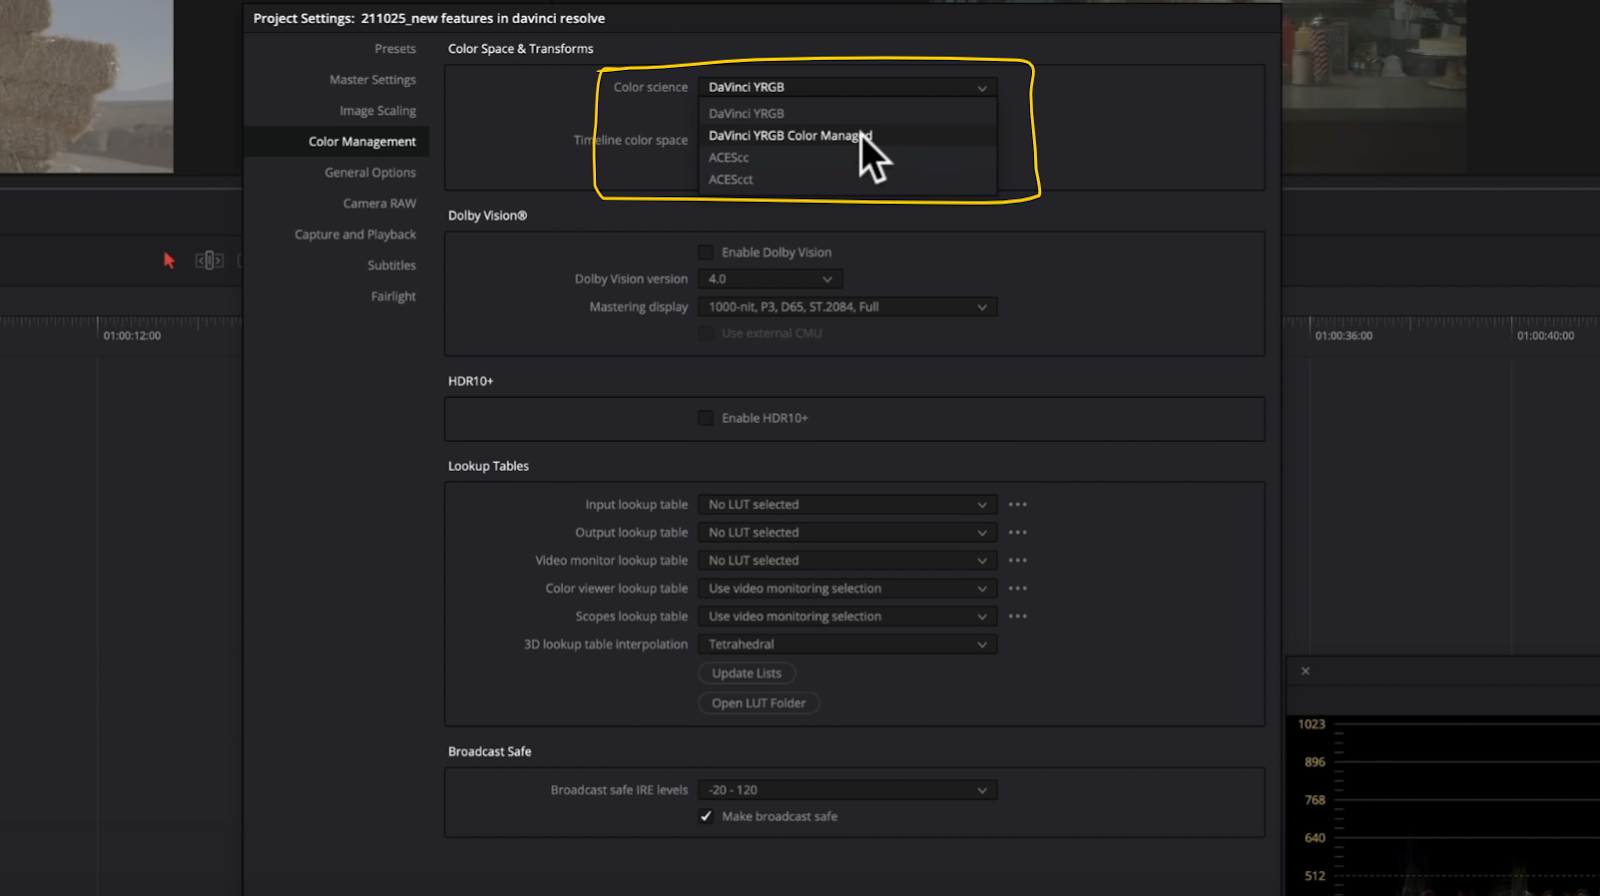
Now you’ll see a little box with a checkmark that says Automatic color management. Resolve already took immense strides with all the color processing modes they added in the first Resolve 17, but now, they’ve taken it to a whole new level.

This now simplifies the whole process so much more. Now all you have to do is pick SDR or HDR under the color processing mode.

Then you select one of four presets in the output color space and you’re golden.

But what’s so cool about that? If you are using RAW clips, Resolve will convert them properly from LOG to REC.709. Now, if they are not RAW, you will need to tell Resolve what camera this clip is from. So what you’ll do is right click on the clip, find input color space and then tell it what color space to use.

Then the image gets properly converted to rec.709.

By doing that, we know that all the math is correct on the backend and we can just get going in our grade. It’s really cool that Resolve made this feature. If you do want more control, you just uncheck the automatic color management, and select which color processing mode you want.
Now let’s move onto one of the best, and my favorite features in this new update, Aces 1.3. Now Aces 1.3 has been out for a little while now, as you can see from this Article.

But Resolve took their time to properly implement it into their program. One of the best parts is the first bullet point, which states
A new gamut compression algorithm to deal with the “blue fringe problem” some users experienced with extremely bright saturated objects.
I’ll show you a quick example of what this is referring to.

You can see this fringing on the outside edges of the neon lights. So let's change this to DaVinci YRGB Color Managed and now let’s look at this.

This was a MASSIVE problem for Aces. You would have to make those changes on a shot by shot basis. Now moving back to Aces, let’s select Aces 1.3. You now get this option for Apply ACES reference gamut compress.

Now look. We are in Aces and there is no color fringe.

Honestly, this opens up the door for everyone to use Aces. And one other thing, if you look at the starting off point using automatic color management in DaVinci YRGB Color Managed, versus Aces with color space aware on, look at the difference.

DaVinci YRGB Color Managed above

Aces 1.3 above.
This change is subtle, but you can see on the Aces 1.3, that it is more cinematic. The colors and contrast pop so much better than DaVinci YRGB color managed.
Now let’s talk about one of the most talked about tools that Resolve added. That would be halation and grain. Before we do this, let’s work in an unmanaged color space for this example.

We are going to use a CST to convert this.


Now I am going to create a prior node and then add two more nodes. Now for halation, I am going to give you two different ways to do it. Normally you’d do this after your rec.709 correction. When I drop it on, it comes on pretty heavy and unrealistic.

So let’s go into our effects and bring our threshold down to tame the beast.

You can see our threshold is all the way back, yet it is still pretty much selecting everything. You can’t really get granular with this.

This waters down the effect of the halation to where I would like it. Let’s exaggerate it a bit to really show you the difference.

Now I am going to reset that node, and then add the effect to the first node. Why? Because most of the time, halation is embedded in your negative, or film negative. When it comes into the finishing room, it’s already a part of that film. It wasn’t added after the fact.

Now look at the isolation. A lot better, giving me a lot more control.

Now it looks a lot better than when you do this after. And you can use the basic grain tab in this effect, to add grain.

Why are we doing this? Again, because when you work with real film, all of this comes embedded in the footage already.

This is why I always say that it’s essential for you to know the sequence of where things go in Resolve.
Now I am going to show you the power of another tool that is extremely effective, the custom mixer. First thing I am going to do is go into my second node, and take my offset to white balance the image. I am going to pull it down towards the cyan color space. Then I also want to crank my contrast a bit.


Now moving to the third node, we will add glow. I am going to drop on the effect and change the composite mode to softlight, then pull my shine threshold back.


Now I want to go back into my primaries and keep moving my offset a bit.


Now things are going to get very interesting. This is where we are going to get into our custom mixer. When you first drop it on, don’t freak out if this is what you first see.

What you need to do is right click on the node, and go to add OFX input.

Once you do that, you will connect the primaries output, and put that into my custom mixer.


So basically what we are doing is taking these two nodes, the glow and primaries nodes, and either blending them, or combining them. Right now, as you see above, we are blending them.

You don’t see the glow up there. That’s because we are only using the primaries. If you swing it to 0, you’d only see the glow. If it’s in the middle, you use 50% opacity of both. Now under advanced options, we can see there are a lot to choose from.

For this, we are going to select overlay.

You can see it’s pushed, so we can pull back on the blend above, until we like it.


But let’s reset that and play with it more. Let’s change it to combine, and look at all of the options it gives you.

Now, our input one would be the glow, and input two would be the primaries. But if I go under my offset, it’s almost like selective colors. However, if I want to go in and uncheck the gang, I can add cyan by subtracting red. If I push it too far, I can add more magenta into it.


Then I can even go into the advanced options and use the composite type to create even cooler looks.

Then I can keep my input two where it is, then push my glow (input 1) even more. Then I can go back down to offset and keep adding more color density to our image.

I just think it’s so powerful what you can do here. Just look at what we were able to create without even touching our custom curves.

This is a brand new tool that I am going to play around with it even more to have a better understanding of what this tool can do, and as I learn these things I will share those tips with you.
Now moving on to another cool aspect of 17.4, which is node info. The reason why this is so cool, is that now if you just hover over the node and leave your cursor over the node, it will tell you exactly which LUT this is. Before it would just tell you that you’re using a LUT, but now it tells you just by hovering over it.

Now what I want to show you is automatic node input. What this does is if I create another node and a parallel node, then later I want to add another parallel node, I can simply connect the inputs and outputs where they need to go. Before, I had to right click on the parallel connector, and say add input. But now, I can just grab it and when I get close enough, it will pop up.

That is just another time saving method in this new update.
Now moving onto our last tool, the forward/reverse tracking. This is an unbelievable timesaving method. So say we create a circle window around this woman’s face. We get it how we want, ready to track.

Before, we had to click forward, then go back to the spot, and click backward track. Now, we can simply press one button and it will do both back and forward.

This also works under our magic mask too.

Now let’s check this out in full screen.

I wanted this to be shorter, but I knew I really had to get in there and deep dive into some of these topics. I hope you found this helpful. Feel free to come back to this one multiple times if you need.
MORE LIKE THIS


