
How to get THE REVENANT look | DaVinci Resolve 16 Tutorial

What’s going on guys, welcome back to yet another awesome tutorial. Today we are going to be recreating a look from The Revenant, so sit back, relax and take some notes! The way we are going to be doing this is with a look DNA so that it will be easy to replicate from shot to shot, and scene to scene.
Alright, let’s go ahead and as always, analyze the image.

First thing that we notice is the complementary color scheme going on in the sky. We have that teal/cyan and the orange/salmon coming through. The grass is burned and desaturated, or natural. The black points are proper too.

Also look at the step action in the highlights on our scopes. This mountain in our scopes means there is a vignette.

These are the things to remember. Just remember, when I create this look I am not going for a 1:1 because there are a lot of variables between shots that won’t allow me to make it exact.
Let’s check out our image now. We have our black points that we can use as an anchor, but we will have to burn the color of the trees to match the grass. In our sky we will add our cyan and salmon.

Alright, let’s jump right in and build out our node tree.

Now starting with our show LUT, we are going to use one of the built in LUTs from DaVinci resolve. We will be using the Kodak 2383 D65.

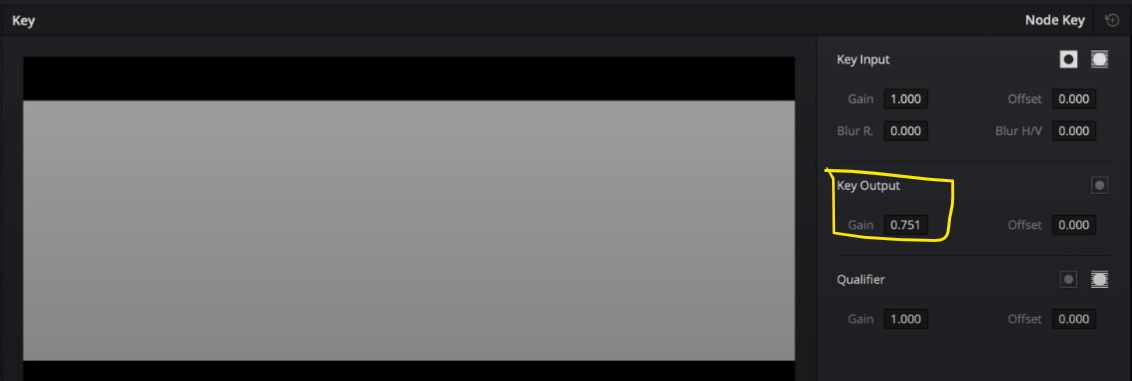
Once I drop it in, it’s pretty crunchy. So I am going to go under my key mode and drop the output to about .750 to just get that film curve really honed in which will give us more of a cinematic, film look.

Now moving to our primaries node, I want to start using my temperature and tint to build out the grade. I am going to start by putting in warmth to the image. Then I can take my tint around to see if I can control it a bit. Then I want to bring my lift and gain down, while bringing the gamma up.

Then moving to my log wheels, I want to pull down my shadows and then open up my low range.


Moving to my look node, I am going to go under my log wheels and what I want to do is take my highlights and start adding more salmon. Be aggressive, it’s okay. Then I am going to go into my midtones and inject teal. I also want to use my low range to control it, so that it stays out of the mountains.


Now I want to go into my grass node and I want to qualify the grass. We will have to modify it some, as well as denoise it a bit.


Now I am going to take my gamma and gain up to try and burn the trees. Then I want to kill some saturation.


That really helped get us there.
Now I want to go under my vignette and create a crazy power window, soften it and invert it.

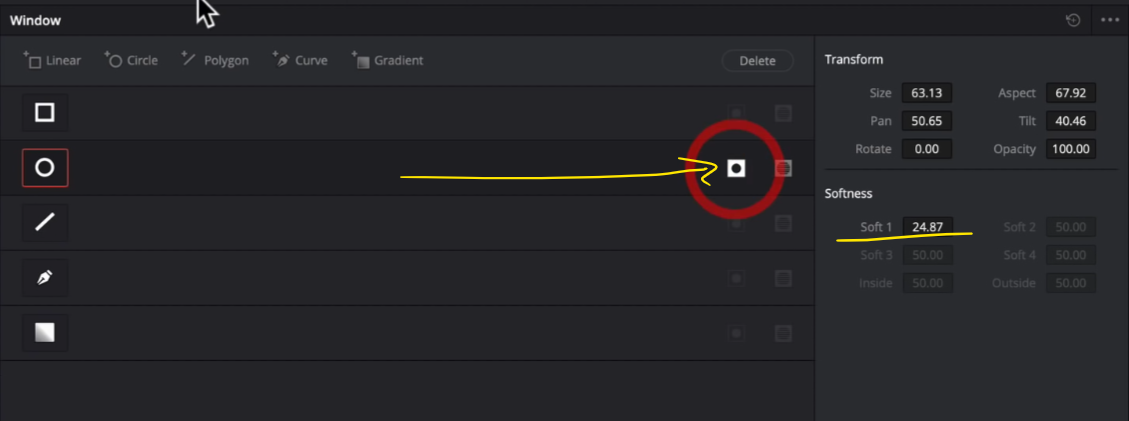
Then I am going to use my curves to bring down the area around the power window to create that vignette and pop out our subject.


Going back into the look node, I am going to play around with my lift, gamma, and gain wheels to see what else I can do. I am going to use my gamma to add that cyan to match the color in our reference mountains. Then I am going to use my gain to add some of that salmon warmth we have in the highlights, then adding some saturation.


Now I am going to add some glow into the image and mess around with the parameters.

Now I know that the contrast in the reference is a bit soft compared to ours, but I will not make our image look worse because I want to fit it into a look. It is totally different from the reference. I personally feel like it is it’s own version of The Revenant look.
This look we did can be easily copied and pasted to other shots. We don’t have any windows to track, or any qualifiers to work with. This is a simple grade we can use that will hold up on other shots.
Now that we are done, we are going to check this out in full screen.

I hope you guys picked up tons of tips and tricks. As I mentioned, we weren’t going for a 1:1 match because in this instance we can’t. Every footage is going to be different, your talent might be wearing different clothes, so you have to keep all these scenarios and variables into account and just get the right mood into place, and that’s what we created here. So with that, I hope you guys learned a lot and I’ll see you in the next tutorial.
MORE LIKE THIS


